
The FairCom ISAM file system is designed for simple configuration and requires little if any ongoing maintenance. The FairCom ISAM database engine uses a client/server architecture. The FairCom ISAM Server is a specialized version of FairCom DB, which is configured separately from the FairCom ISAM client. Client configuration is discussed in this section. A graphical Configuration Tool is provided to simplify the process. The FairCom DB is configured separately from FairCom ISAM, as described in the Configuring the FairCom DB Server chapter of the FairCom DB Server Administrator's Guide.
Information about configuring the FairCom ISAM Client is provided in this chapter in this manual. |
For information about configuring the FairCom ISAM Server, refer to Configure the FairCom ISAM Server in this book and the Configuring the FairCom DB Server chapter of the FairCom DB Server Administrator's Guide. |
Configure while You Migrate
If you migrate your data using the RTG Migrate graphical tool, you can create a basic configuration file in the final step of the wizard, as described in RTG Migrate.
Much of the information you need for configuring your system is entered when you migrate your data. If your system has additional considerations that dictate a more complex configuration file (such as files that need to be treated specially, multiple clients, servers, etc.), this chapter will explain how to edit the configuration file to make adjustments.
If you create a configuration file when you migrate your data, you can skip the Basic Configuration wizard and edit the resulting file as described in Editing a Configuration File.
FairCom ISAM Configuration and Management
After you have set up FairCom ISAM, you will need to do some configuration and management:
Configuration (ctree.conf)
The FairCom ISAM configuration file, ctree.conf, is an XML file that contains Structure Elements, which define the structure of the system, such as the server to connect to and any files that need special treatment and Settings Elements, which specify the settings to be applied to the Structure Elements. See FairCom ISAM Configuration and Configuration File Elements.
Management (ctutil)
ctutil is a general purpose FairCom ISAM file maintenance utility, used ctutil to examine files, extract data records, change maximum record sizes, and rebuild corrupted indexes. Much of ctutil's functionality is comparable to Vision's vutil utility for a familiar feel, however, ctutil includes many additional FairCom ISAM extensions and features. You will use this utility, and several others, for managing FairCom ISAM. See FairCom ISAM Utilities.
CTREE_CONF Environment Variable
The CTREE_CONF environment variable specifies the full path to the configuration file. If CTREE_CONF is not defined, FairCom ISAM searches for a file named ctree.conf in the current directory (the directory of execution of the user application that loads FairCom ISAM).
Windows
set CTREE_CONF=C:\MyConfigFiles\my.ctree.BTRV.conf
Unix/Linux
CTREE_CONF=/etc/MyConfig/my.ctree.BTRV.conf
export CTREE_CONF
FairCom ISAM Configuration Tool - RTG Config
The FairCom ISAM (and RTG) configuration tool, RTG Config, provides a graphical interface for configuring the FairCom ISAM products. This tool helps you to edit the XML file, ctree.conf, which is used to configure these products. It also tests ctree.conf for correctness, so you can use it to find any problems with a ctree.conf you have edited by hand.
The RTG Config tool, RTGConfig.jar, is located in the Tools\guitools.java\ directory.
The ctree.conf file consists of a collection of elements nested in a hierarchy. The <config> element is the root of the hierarchy. It will have one or more <instance> elements below it. Both <config> and <instance> can have other elements beneath them (e.g., <file>). Options (such as data compression) can be applied to elements in the tree. The tool displays descriptions of the selected elements and options. (For more complete definitions of the elements, see Configuration File Elements. For more about the file format see FairCom ISAM Configuration File).
The Configuration Tool depicts the XML hierarchy as a tree. The tree is composed of:
-
 Elements (e.g., config, instance, file, etc.) are depicted as folders. These elements define the basic structure you will configure. Each configuration file has a single <config> element with at least one <instance> under it. See Structure Elements.
 -
 Attributes (e.g., name) are depicted as red dots (a summary of attributes also appears after the name of each element). They are details that further describe an element (e.g., a file element is specified with a name or directory attribute).
 -
 Options (e.g., datacompression) are depicted as blue dots. They are optional settings that can be applied to an element. See Settings Elements.
You can click the + or - buttons next to each branch to expand or collapse it. The tool bar provides Expand Tree ![]() and Collapse Tree
and Collapse Tree ![]() buttons to quickly hide or show all details. The Show Attributes button allows you to hide or display attributes to simplify viewing the tree.
buttons to quickly hide or show all details. The Show Attributes button allows you to hide or display attributes to simplify viewing the tree.
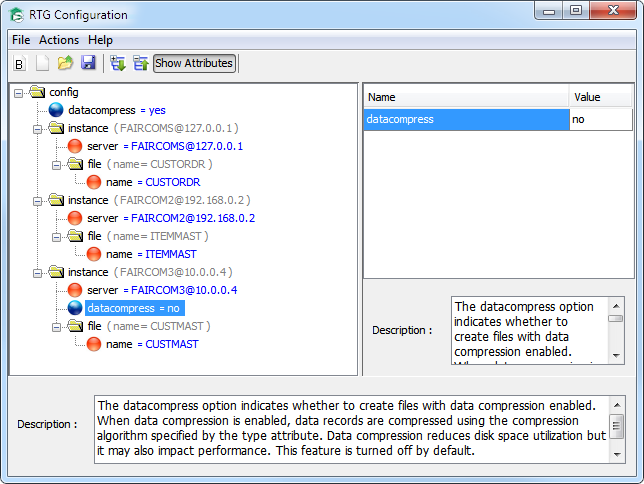
The image above depicts the following XML configuration file, ctree.conf (data compression will be active for all the specified instances but not for the third instance ("FAIRCOM3") which specifies its own datacompress setting):
<?xml version="1.0" standalone="yes"?> |
XML header. |
<config> |
This is the root element; all of the other elements and settings are subordinate to it. |
<datacompress>yes</datacompress> |
This option element is immediately under the root level, so it applies compression to all elements (unless it is overridden at a lower level). |
<instance server="FAIRCOMS@127.0.0.1"> |
This structure element specifies an instance of a connection to a FairCom ISAM server, called FAIRCOMS, specified by the server= attribute. |
<file name="CUSTORDR"/> |
This structure element uses the name= attribute to specify the CUSTORDR file, which is on the FAIRCOMS FairCom ISAM server because this element is a child of that instance. |
</instance> |
The end of the FAIRCOMS instance. |
<instance server="FAIRCOM2@192.168.0.2"> |
An instance of a connection to a FairCom ISAM server called FAIRCOM2. |
<file name="ITEMMAST"/> |
This structure element specifies the ITEMMAST file on the FAIRCOM2 FairCom ISAM server. |
</instance> |
The end of the FAIRCOM2 instance. |
<instance server="FAIRCOM3@10.0.0.4"> |
This structure element specifies an instance of a connection to a FairCom ISAM server called FAIRCOM3. |
<datacompress>no</datacompress> |
This settings element turns off compression for its parent instance, FAIRCOM3. |
<file name="CUSTMAST"/> |
This structure element specifies the CUSTMAST file on the FAIRCOM3 FairCom ISAM server. |
</instance> |
The end of the FAIRCOM3 instance. |
</config> |
The end of this configuration file. |
For more about the file format, see FairCom ISAM Configuration File.
Configuration Tool Menus
The following menus are provided:
File
- New (Basic) - Create a simple configuration file.
- New (Advanced) - Create a new configuration file (see below).
- Open - Opens a configuration file.
- Save - Saves the current configuration file.
- Save As - Allows the current configuration file to be saved under a new name.
- Exit - Closes the tool and exits.
Actions
- Remove Item - Removes the selected item from the configuration file.
Help
- About - Displays information about the version of the tool.
Tool Bar
The following controls are provided in the tool bar:
-
 New File (Basic) - See Creating a New File (Basic). Create a basic configuration file. The Basic Configuration window will appear so you can create a new configuration file.
 -
 New File (Advanced) - See Creating a New File (Advanced). Create a new configuration file.
 -
 Open a File - Opens a configuration file.
 -
 Save Current File - Saves the current configuration file.
 -
 Expand Tree - Expands the display of the tree to show all branches so that the full contents of the file can be seen. You can click the - buttons next to each branch to collapse it.
 -
 Collapse Tree - Collapses the display of the tree to show all branches so that only the top level of the file can be seen. You can click the + buttons next to each branch to expand it.
 -
 - Use this button to display or hide the attributes of the elements. Showing attributes depicts attributes as separate items in the tree; hiding them can make it easier to see the entire tree.
Creating/Editing Your Configuration File
The RTG Config tool provides two ways to create your configuration file:
- Basic Configuration - This simple, two-step wizard guides you through the configuration process to get started in a hurry. Fill in the fields to create a configuration file that connects to a single FairCom RTG/ISAM server. If you require a more advanced configuration, you can start with the Basic Configuration wizard and then use the RTG Config to edit the file. See Creating a New File (Basic).
- Advanced Configuration - The RTG Config allows you to create and edit a configuration file. Selecting File > New (Advanced) (or clicking on the corresponding hot button), clears any entries shown in the RTG Config tree view (and prompts you to save changes, if any) and starts a new configuration. You can then add the elements required for your environment. See Creating a New File (Advanced).
See also
Creating a New File (Basic)
The Basic Configuration wizard allows you to configure your system in a hurry. This wizard will help you create a configuration file for a system that connects to a single FairCom ISAM server. It offers a rich set of options, so it may be all you need to get going.
If your system is more advanced, for example if it connects to multiple FairCom ISAM servers, you can start with the Basic Configuration wizard and then edit the results in the RTG Config tree window (or you can simply start with New File (Advanced)). If you created a basic configuration file when you migrated your data with the RTG Migrate tool, you can skip the Basic Configuration wizard and edit the resulting file as described in Editing a Configuration File.
To create a new configuration file using the Basic Configuration wizard:
- Select File > New (Basic) or click the New File (Basic) hot button:
If you have unsaved changes in the configuration shown in the tree, you will be prompted to save them.
The Basic Configuration wizard will appear:

- Fill in the fields listed in this dialog. The first tab, called Create Instance, is where you define your connection to the FairCom ISAM server.
Instance - These fields define how you log onto the FairCom ISAM server:
Server - Specifies the server name and the host name of the FairCom ISAM to connect to. The format can be one of the following syntaxes:
servername
servername@hostname
servername@IPaddress
If the host name or the IP address is omitted, host name defaults to localhost.
User - Specifies the FairCom ISAM user name.
Password - Specifies the FairCom ISAM user password.
Instance Global Options - These fields define attributes that apply to this entire connection to the FairCom ISAM server. Many options are available, including transaction processing, encryption, compression, logging, and file name suffixes. The options provided here correspond to the configuration Settings Elements defined later in this manual.
- The Files / Directories Maps tab allows you to enter more information about the location of your files.
Notice that these fields accept wildcards. See Wildcard File Matching Rules and File Matching Precedence.

- Click Create to save your file. A file dialog will allow you to select a folder and file name for the configuration file.
The new configuration file will be displayed in the RTG Config showing the instance you created. You may now add elements as described in the later sections, Editing a Configuration File.
Creating a New File (Advanced)
To create a new configuration file:
- Select File > New (Advanced) or click the New File (Advanced) hot button:
If you have unsaved changes in the configuration shown in the tree, you will be prompted to save them.
A new configuration will be created in the tree with a single root element, <config>.

- Each configuration file requires at least one <instance> element. You will need one instance for each connection to a FairCom ISAM server.
To add a new instance, right-click on the <config> root element and select Add New Element > Instance. The New Instance dialog appears so you can enter the basic information needed for specifying the FairCom ISAM server.

Note: If your environment includes more than one FairCom ISAM server, you will need to create an instance for each one. Each instance will be directly under the root <config> element. To add another instance, right-click the <config> element and select Add New Element > Instance.
- Fill in the fields listed in this dialog:
Server - Specifies the server name and the host name of the FairCom ISAM to connect to. The format can be one of the following syntaxes:
servername
servername@hostname
servername@IPaddress
If the host name or the IP address is omitted, host name defaults to localhost.
User - Specifies the FairCom ISAM user name.
Password - Specifies the FairCom ISAM user password.
Connect - Choose the desired setting to indicate whether to connect to FairCom ISAM at runtime initialization or wait for the first OPEN operation.
- Not Set - Use the default value.
- Yes - Connect at runtime initialization.
- No - Connect during the first OPEN operation. This is the default value.
- Not Set - Use the default value.
- Yes - Turn on version matching check. Versions must match exactly otherwise an error is returned at runtime initialization.
- No - Turn off version matching check. This is the default value.
- A file dialog will allow you to select a folder and file name for the configuration file.
The new configuration file will be displayed in the RTG Config showing the instance you created. You may now add elements as described in the subsequent sections, Editing a Configuration File.
Editing a Configuration File
The configuration file consists of a collection of elements and attributes nested in a hierarchy. The hierarchy is depicted by the tree displayed in the Configuration Tool. The tool allows you to edit the tree by adding and removing elements and attributes. The tool displays information about the selected elements and attributes.
To add an element to the file:
- Select an existing element in the file. The new element will be placed under the selected element (e.g., the selected element will be the parent of the new element: if you select <config>, the new element will be a child of <config>; if you select <instance>, the new element will be a child of <instance>).
- Right-click on the selected element and select Add New Element from the menu that appears.
- Select the desired element from the list of valid elements that appears.
The list shows only elements that can be used at the selected location in the tree. This implies that the list will be different depending on the element selected in step 1.
- The new element will be placed in the tree.
- The new element will be given a default value. A list labeled Name and Value is shown in the right side of the tool. Edit the value in that list to set the desired value.

To add an attribute to an element:
- Select an existing element in the file. The new attribute apply to the selected element (e.g., the selected element will be the parent of the new attribute).
- Right-click on the selected element and select Add New Attribute from the menu that appears.
- Select the desired attribute from the list of valid attributes that appears.
The list shows only those attributes that can be used at the selected location in the tree, so the list will be different depending on the element selected in step 1.
- The new attribute will be placed in the tree under the selected element.
- The new attribute will be given a default value. A list labeled Name and Value is shown in the right side of the tool. Edit the value in that list to set the desired value.

To remove an element from the file:
- Right-click on the element.
- Select Remove Item from the menu that appears.
Encrypting the Configuration File
It is possible to prevent the user from seeing the user password in ctree.conf by using configuration files that are encrypted. The typical configuration files in XML format can be encrypted using the ctutil command ‑cryptconf. Usage:
ctutil -cryptconf config_file output_file
Notice: For security reasons, FairCom does not provide a way to decrypt an encrypted configuration file. Hence, it is advisable to maintain a “clear text” version of ctree.conf in a safe place for future reference.
See
Checking the Configuration Using CTREE_LOG and ctutil
Several techniques are provided to test that the FairCom ISAM configuration file is correct:
- ctutil -test config
- ctutil -c <file> -test config
- CTREE_LOG
ctutil
The ctutil -test command is documented in the FairCom ISAM Utilities chapter: ctutil -test
CTREE_LOG
Defines the name of the file to log events.
Syntax
CTREE_LOG=filename
where:
- filename - the file name of the log file.
Example
CTREE_LOG=ctree.log
New configuration format
This option can be specified using the <log> option. Please remember that the log option needs at least one child tag to specify what to log.
CTREE_CONF_DUMP environment variable to specify configuration dump file
The CTREE_CONF_DUMP environment variable allows the FairCom ISAM configuration to be saved to a specified file in XML format. If the value of this environment variable is a file name, FairCom ISAM dumps its configuration in XML format to the specified file after FairCom ISAM has been initialized with a ctree.conf (or iscobol.properties) configuration.
IsCOBOL Tip: This feature can be used as a way to migrate the isCOBOL configuration options related to FairCom ISAM from iscobol.properties format to ctree.conf format.